
Blue Vane Trap Information
Main Page Nesting Block Information Public Monitoring with iNaturalist FAQs
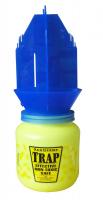
Blue Vane Traps attract some pollinating insects (bees, wasps and flies) using color. The insects fly towards the blue and yellow coloring and into the trap, where they are captured in water. The specimens collected by our citizen scientists will help us understand which insects are foraging and searching for pollen and nectar resources in Pheasants Forever pollinator plots.
Citizen Scientist Protocol
When to Hang Your Blue Vane Trap
- Hang your trap 3 times over the course of the season.
- Once during the first two weeks of April.
- Once during the first two weeks of June.
- Once during the first two weeks of August.
- It is best to hang your blue vane trap in the evening and pick up the following evening so that you won’t disrupt pollinators visiting your pollinator plot.
- Pick a sunny, warm day (50°F and up) to hang your trap. Temperatures below 50°F will collect few to no insects. Cloudy days get fewer insects and rainy days may get no insects at all.
Setting Up Your Blue Vane Trap
- Place the blue vane trap stand (5’ green steel fence post, provided) in your pollinator plot so it is sturdy. Try to place it at least 20 feet into your plot.
- Unscrew and remove the blue top and add 2-3 drops of liquid soap (provided) into the yellow bottom of your Blue Vane Trap.
- Add 1 – 2 inches of water to the yellow bottom of your blue vane trap and gently mix with liquid soap detergent.
- Secure the blue top back on top of your blue vane trap.
- Slide the 2 plastic blue vanes together.
- Slide the blue vanes into the top of the blue vane trap. All 4 tabs will ‘snap’ once they are secure in their slots. These blue vanes can stay in place - you can still unscrew and remove the top of the blue vane trap as needed.
- Slide the wire (provided) through the holes in the top of the blue vanes and attach the trap to your stand. The bottom of the trap should be at the same level as the plants growing and blooming in your plot. The blue portion of the trap should be visible and not obstructed by any vegetation. Attach the trap to your stand where needed to get the desired height.
- Once it is set up, take a picture of your blue vane trap.
- Fill out a Blue Vane Trap data sheet when hanging up and removing your trap. This data, along with photos, can be submitted online at http://go.unl.edu/ninb.
- Hang the trap up for a period of 24 hours.
Collecting Samples from Your Blue Vane Trap
- Once your 24-hour period is up, remove the yellow bottom from your blue vane trap.
- Carefully pour the contents through a coffee filter (provided) and let the water drain through.
- Invert the filter into a small Ziploc bag (provided) and gently shake insect specimens into the bag. Use a plastic spoon (provided) to gently remove any specimens still on the coffee filter.
- Pump some hand sanitizer (provided) into the Ziploc bag – just a few pumps so that insects are covered.
- In pencil (provided) fill in a small label (provided) with your site number, name, pick up/collection date and time. Place this label in the Ziploc bag.
- Seal and freeze the ziploc bag with insect specimens until you are ready to ship or drop off samples. Send these samples with one of your nesting block shipments.